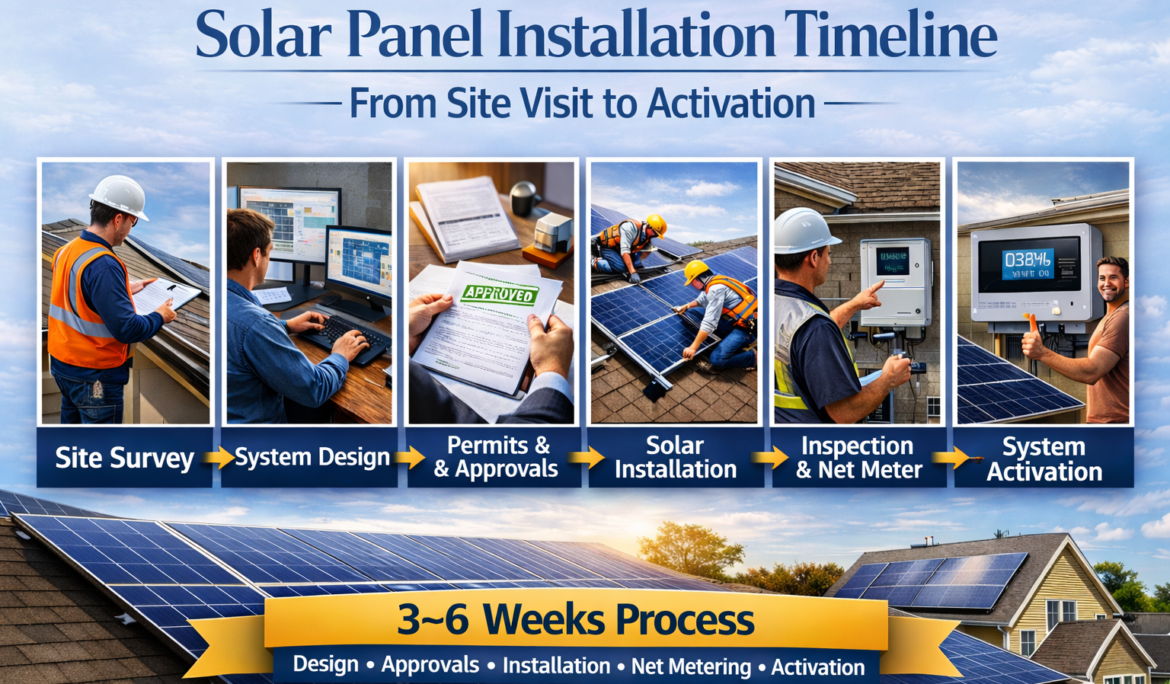
Solar Panel Installation Timeline – From Site Visit to Activation
Switching to solar energy is no longer just an environmental choice — it’s a smart financial investment. Whether you’re a homeowner or a business owner, understanding the complete Solar Panel Installation timeline helps you plan better and avoid unnecessary delays. Many people assume installing solar is a long, complicated process, but in reality, it follows a clear and structured sequence.
In this detailed guide, we’ll walk you through every stage of the Solar Panel Installation journey — from the first site visit to system activation. Along the way, we’ll also cover important secondary topics like rooftop solar system design, solar inverter installation, net metering process, solar subsidy application, and solar panel maintenance.
Initial Consultation & Site Visit in Solar Panel Installation
The journey begins with a professional consultation. At this stage, a solar expert evaluates your energy needs, electricity bills, and available rooftop space.
What Happens During the Site Survey?
During the site visit for Solar Panel Installation, technicians assess:
-
Roof direction and tilt angle
-
Shadow analysis (trees, nearby buildings)
-
Structural strength of the rooftop
-
Electrical panel compatibility
-
Average monthly electricity consumption
This step is crucial for designing an efficient rooftop solar system. A poorly assessed site can lead to reduced performance and lower energy savings.
Most companies complete the initial survey within 1–2 days of inquiry. After the assessment, you receive a customized solar proposal that includes:
-
System capacity (kW)
-
Estimated solar panel cost
-
Projected savings
-
Payback period
-
Solar panel warranty details
This consultation stage usually takes 2–5 days.
System Design & Proposal Finalization for Solar Panel Installation
Once the site visit is complete, engineers move to the design phase. This step ensures your solar power system delivers maximum efficiency.
Customized Rooftop Solar System Design
The design team creates a layout that includes:
-
Panel placement strategy
-
Solar inverter installation planning
-
DC and AC wiring routes
-
Safety mechanisms
-
Earthing and lightning protection
They calculate system generation based on local solar irradiance and your energy demand. If you’re installing a grid-connected solar system, the design also considers the net metering process requirements.
This stage generally takes 3–7 working days depending on system complexity.
Documentation & Solar Subsidy Application
Paperwork is one of the most underestimated parts of Solar Panel Installation. However, it plays a critical role in ensuring smooth approvals.
Required Documents
Typically, you’ll need:
-
Electricity bill copy
-
Property ownership proof
-
Government ID
-
Passport-sized photographs
-
Application for net metering
If you’re eligible for a government solar subsidy, your installer assists in submitting the solar subsidy application through the appropriate portal.
Approval timelines vary by region but usually take 1–3 weeks.
Procurement of Solar Panels & Components
After approvals, the installer orders all necessary components. These include:
-
Solar PV modules
-
Solar inverter
-
Mounting structures
-
DC cables and connectors
-
AC distribution box
-
Earthing kit
High-quality components are essential for long-term performance. Reputable providers ensure that all equipment meets industry standards and includes manufacturer warranties.
This stage usually takes 5–10 days depending on stock availability.
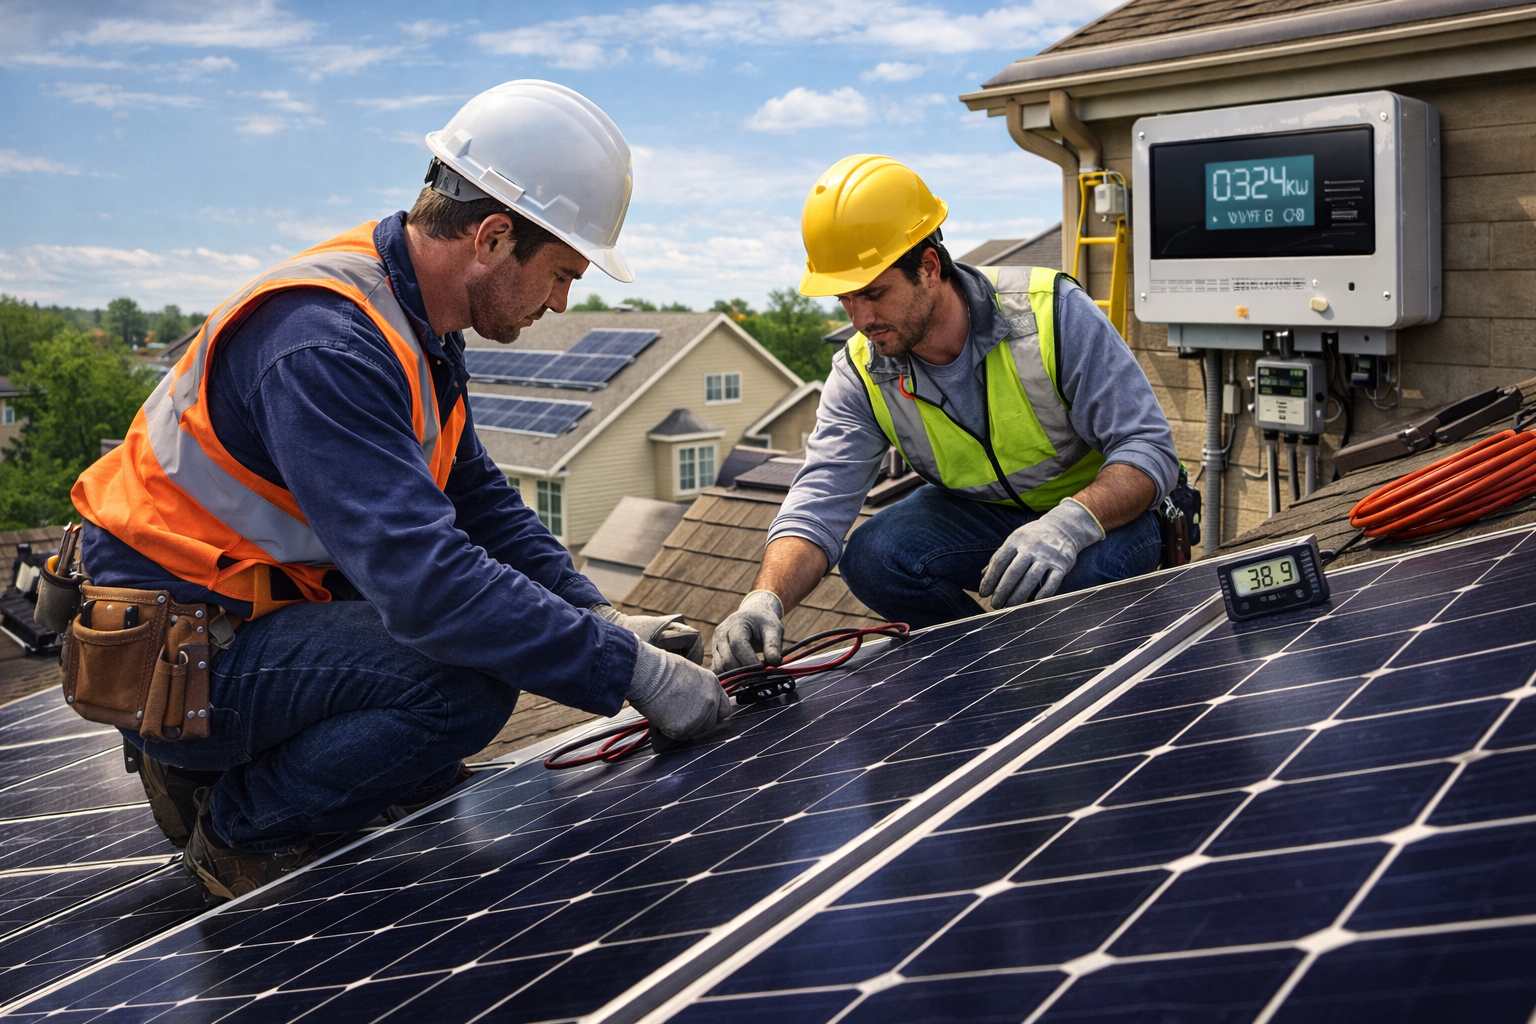
On-Site Solar Panel Installation Process
Now comes the most visible part — the physical Solar Panel Installation on your rooftop.
Step-by-Step Installation Process
-
Mounting structure installation
-
Solar panel fixing
-
Solar inverter installation
-
DC and AC wiring
-
Earthing and lightning protection
-
System testing
For a standard 3kW to 5kW rooftop solar system, installation typically takes 1–3 days. Larger commercial projects may require 5–7 days.
Professional installers ensure:
-
Proper tilt angle for maximum sunlight
-
Secure mounting to withstand wind loads
-
Safe electrical connections
-
Compliance with electrical safety standards
This phase is critical because improper Solar Panel Installation can reduce efficiency and compromise safety.
Inspection & Net Metering Process
Once installation is complete, the system undergoes inspection by local electricity authorities.
Net Meter Installation
For grid-connected solar systems, the utility company installs a bidirectional meter. This allows you to:
-
Export excess electricity to the grid
-
Receive credit for surplus power
-
Reduce monthly electricity bills
The net metering process may take 1–2 weeks depending on local regulations.
During inspection, authorities check:
-
Wiring safety
-
System compliance
-
Inverter configuration
-
Meter compatibility
Only after approval can the system be activated.
System Activation & Commissioning
This is the final and most exciting stage of Solar Panel Installation — activation day.
Final Testing & Power Generation
Engineers perform:
-
Voltage testing
-
Performance monitoring setup
-
Inverter configuration
-
Safety checks
Once switched on, your system begins generating clean solar energy immediately. Most modern inverters come with mobile app integration, allowing real-time monitoring of energy production.
Congratulations — your solar power system is now live!
Factors That Affect Solar Panel Installation Duration
Several factors can influence the completion time:
-
Government approval delays
-
Weather conditions
-
Rooftop structural modifications
-
Custom system requirements
-
Component availability
Choosing an experienced installer significantly reduces delays in Solar Panel Installation.
After Installation – Solar Panel Maintenance & Monitoring
The journey doesn’t end after activation. Proper solar panel maintenance ensures long-term performance.
Maintenance Tips
-
Clean panels every 3–4 months
-
Monitor inverter performance regularly
-
Schedule annual inspection
-
Check wiring and mounting structures
A well-maintained solar energy system can last 25 years or more with consistent efficiency.
Why Understanding the Solar Panel Installation Timeline Matters
Knowing the complete Solar Panel Installation process helps you:
-
Plan finances effectively
-
Track project progress
-
Avoid unnecessary delays
-
Ensure proper documentation
-
Maximize return on investment
Solar adoption is growing rapidly due to rising electricity costs and increased awareness about renewable energy solutions. Understanding each stage empowers you to make informed decisions.